
Inside the home additions process: a real Austin project, documented from the ground up
Every phase from excavation through finish work, photographed on active Teamwork Home Designs projects. The before photos are here. Come back in a few months for the after.

Most contractors show you the finished product. We are showing you the whole home additions process, from the first shovel in the ground to tile being set on the floor. These photos are from real projects currently underway in Austin. No staging, no cleanup, no skipping to the good part. Just the actual work, documented at every stage.
If you are planning an addition and want to understand what the build actually involves, this is it. Once these projects wrap up, this post gets updated with the finished results. Check back in a few months.
Site preparation and excavation: where every home additions process starts
Before a single piece of lumber goes up, the site has to be ready. That means excavating to the correct depth, grading for drainage, locating underground utilities, and setting forms before the pour. Any conflicts with existing plumbing or electrical get resolved here before they become expensive mid-build surprises. On this Austin project, the team used a skid steer to dig out the addition footprint. The orange safety fencing marks the tree protection zone, a real permit requirement when heritage oaks are within range of the work area.

Excavation in progress. The skid steer digs to the correct depth before concrete forms are set.

The slab poured and curing. Anchor bolts are already set for the wall framing that follows.
Most surprises in a home addition happen underground. The site work phase is where you find them, and where a good contractor solves them before framing ever starts.
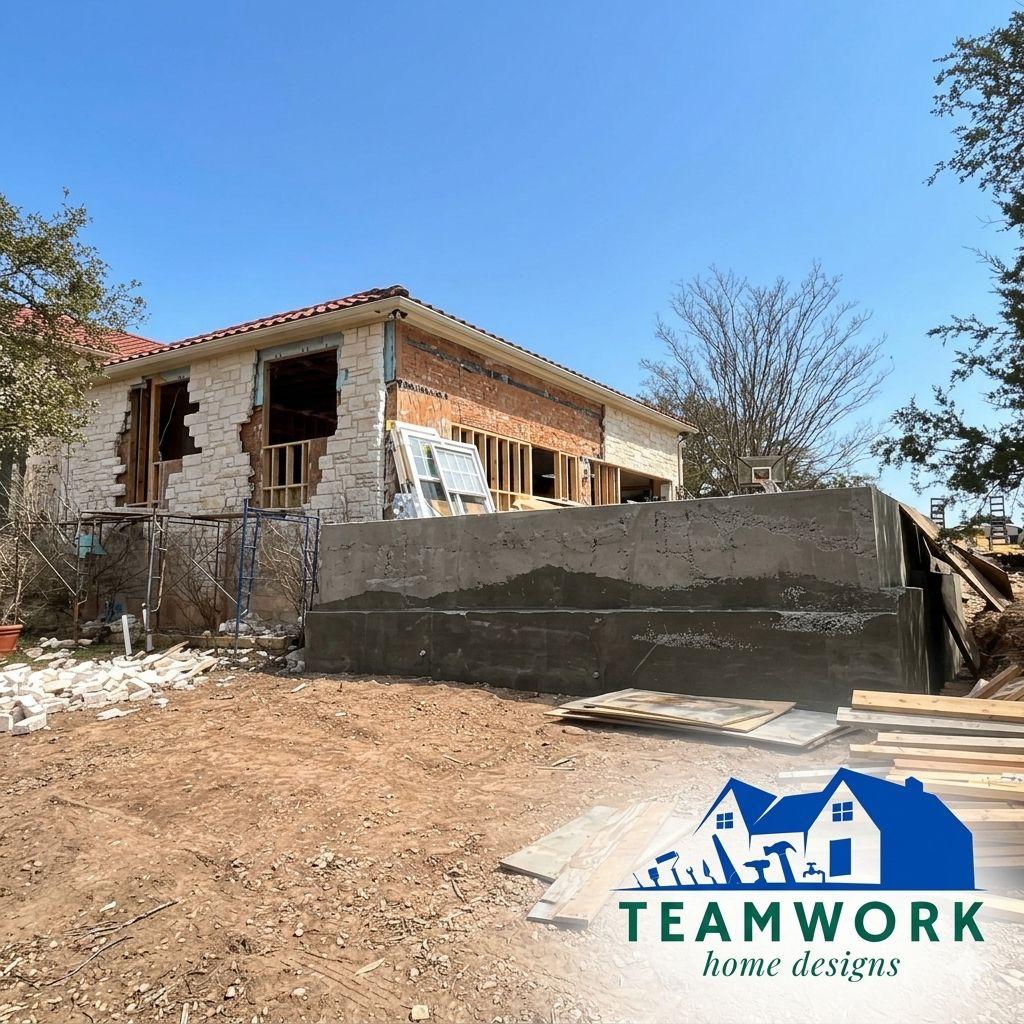
Foundation walls: building the base that carries everything above
Once the slab cures, the foundation walls go up. On this project the grade change required a concrete stem wall to tie the new addition into the existing structure at the right elevation. The stone veneer of the original home is visible on the right. The new concrete stem wall is being formed and poured on the left. Getting this connection structurally correct matters more than most homeowners realize. The addition has to be married to the original foundation.


The new addition rising from its foundation. The concrete stem wall below transitions to wood framing above, then ZIP System sheathing closes the envelope.
Framing: when the home additions process becomes visible from the street
Framing is the phase most homeowners wait for. The walls go up, the trusses land, and the footprint of what you are adding becomes something you can walk through. On this project, the crew built a two-story addition attached to an existing stone home with a vaulted ceiling in the main room. ZIP System sheathing closes the envelope as each section of framing is completed.


The addition rises. ZIP System structural sheathing is applied as each section of framing is completed.


The framing stage is where you start to feel the scale of what is being added. A number on a floor plan becomes a room you are standing inside.

The crew inside the framed addition. The Hill Country view through the window openings shows exactly why this homeowner chose to expand in place rather than move.
Rough-ins and insulation: the work inside the walls
After framing, the mechanical systems go in before anything gets closed up. Electrical is run to every box, plumbing is roughed in for wet spaces, HVAC ducts are positioned, and insulation follows once inspections pass. Moving a duct or a panel after drywall is expensive. Getting it right here is not. The arched detail framed into the hallway opening between the old and new section is a design choice locked in at the planning stage. That kind of detail does not get added later.


The arched opening framed between the old structure and the new addition. Details like this are decided in the design phase and built into the framing from the start.


Finish work: floors, tile, and the details that define the final result
Drywall goes up, mud and tape follow, and then the finish trades take over. Flooring, tile, cabinetry, fixtures, paint. This is the slowest part of the home additions process in terms of feel, because each trade has to wait for the previous one to finish before starting. It is also where the design selections made months ago finally show up in physical form.
These photos show large-format wood-look tile being set with leveling clips in one of the new rooms, and a custom patterned tile installation in progress in the addition’s bathroom. The yellow leveling clips ensure every tile sits flat and the grout joints stay consistent while the adhesive cures. It takes longer than it looks from the outside.


Tile leveling clips keep large-format floors flat while adhesive cures. The patterned bathroom tile is a custom detail being set to a specific layout designed in the planning phase.
What the home additions process looks like from day one to done
These photos span roughly four months of active construction across multiple projects. The home additions process in Austin runs three to six months for ground-level builds and up to a year for second-story additions. Permitting and design add another four to twelve weeks before construction starts.
What the photos do not show is everything that happened first: structural drawings, permit submissions, materials orders, scheduling. That prep is where projects succeed or stall. A home addition contractor in Austin who manages the full sequence keeps timelines and budgets intact. These projects are still in progress. Come back in a few months to see how this all turns out.
Frequently asked questions
How long does the home additions process take in Austin?
Plan for three to six months of construction for a ground-level addition, and six months to a year for second-story projects. Add four to twelve weeks for design finalization and permitting before construction starts. The full timeline from first conversation to move-in on a typical Austin addition runs six to twelve months depending on complexity and permit queue times.
What permits are required for a home addition in Austin?
All structural additions require a building permit in Austin, which includes plan review, structural approval, and multiple inspections throughout construction. Electrical, plumbing, and mechanical permits are pulled separately as each trade begins work. Your contractor manages all permit applications as part of the project, not as a separate engagement.
What happens during the rough-in phase?
The rough-in phase is when all mechanical systems are installed inside the open wall and ceiling framing before drywall closes everything up. Electrical wiring is run to every box. Plumbing is positioned for any wet spaces. HVAC ducts are set. Insulation goes in after the rough-in inspections are passed. This is the phase that determines how the finished space will function, which is why getting it right matters more than most homeowners realize.
Can I stay in my home during a home addition?
Usually yes. Ground-level additions can almost always be built while the homeowner stays in place, with temporary barriers keeping the construction zone separate from living areas. Second-story additions are more disruptive during roofline work. Your contractor will walk through specific impacts before construction starts so there are no surprises mid-build.
How much does a home addition cost in Austin in 2026?
Ground-level additions in Austin typically run $175 to $375 per square foot depending on complexity, plumbing requirements, and finish level. Second-story projects run $300 to $500 or more per square foot due to structural demands. The most accurate number for your specific project comes from a site consultation, not a general range.
What does a home addition add to property value?
Home additions typically return 40 to 70 percent of their cost at resale depending on project type and execution quality, according to Remodeling Magazine’s 2025 Cost vs. Value report. The return is higher for bedroom and bathroom additions that move the home into a new buyer tier. ADUs return differently, with lower resale percentage but rental income potential while you own the property. The daily livability gain is the part the data does not capture.
Start your project
Thinking about adding on to your Austin home?
Teamwork Home Designs manages the full home additions process in Austin: design, permits, structural work, and construction from start to finish. If you want to know what your specific addition would take and what it would cost, a site consultation is the right first step.